Building a Post-Purchase Survey mini
This documentation is outdated and only applies to partners with existing Minis. Please check back soon for new platform announcements.
What will you learn?
In this guide, you'll learn how to:
- Set up an extension
- Accept data from an order
- Render a survey component on the orders screen
Prerequisites
This guide assumes that you have your test Store set up and that you have already been onboarded to the Minis Platform.
Step 1: Set up your mini's extension
Run the create-extension command to create an extension. You can choose where to render the location:
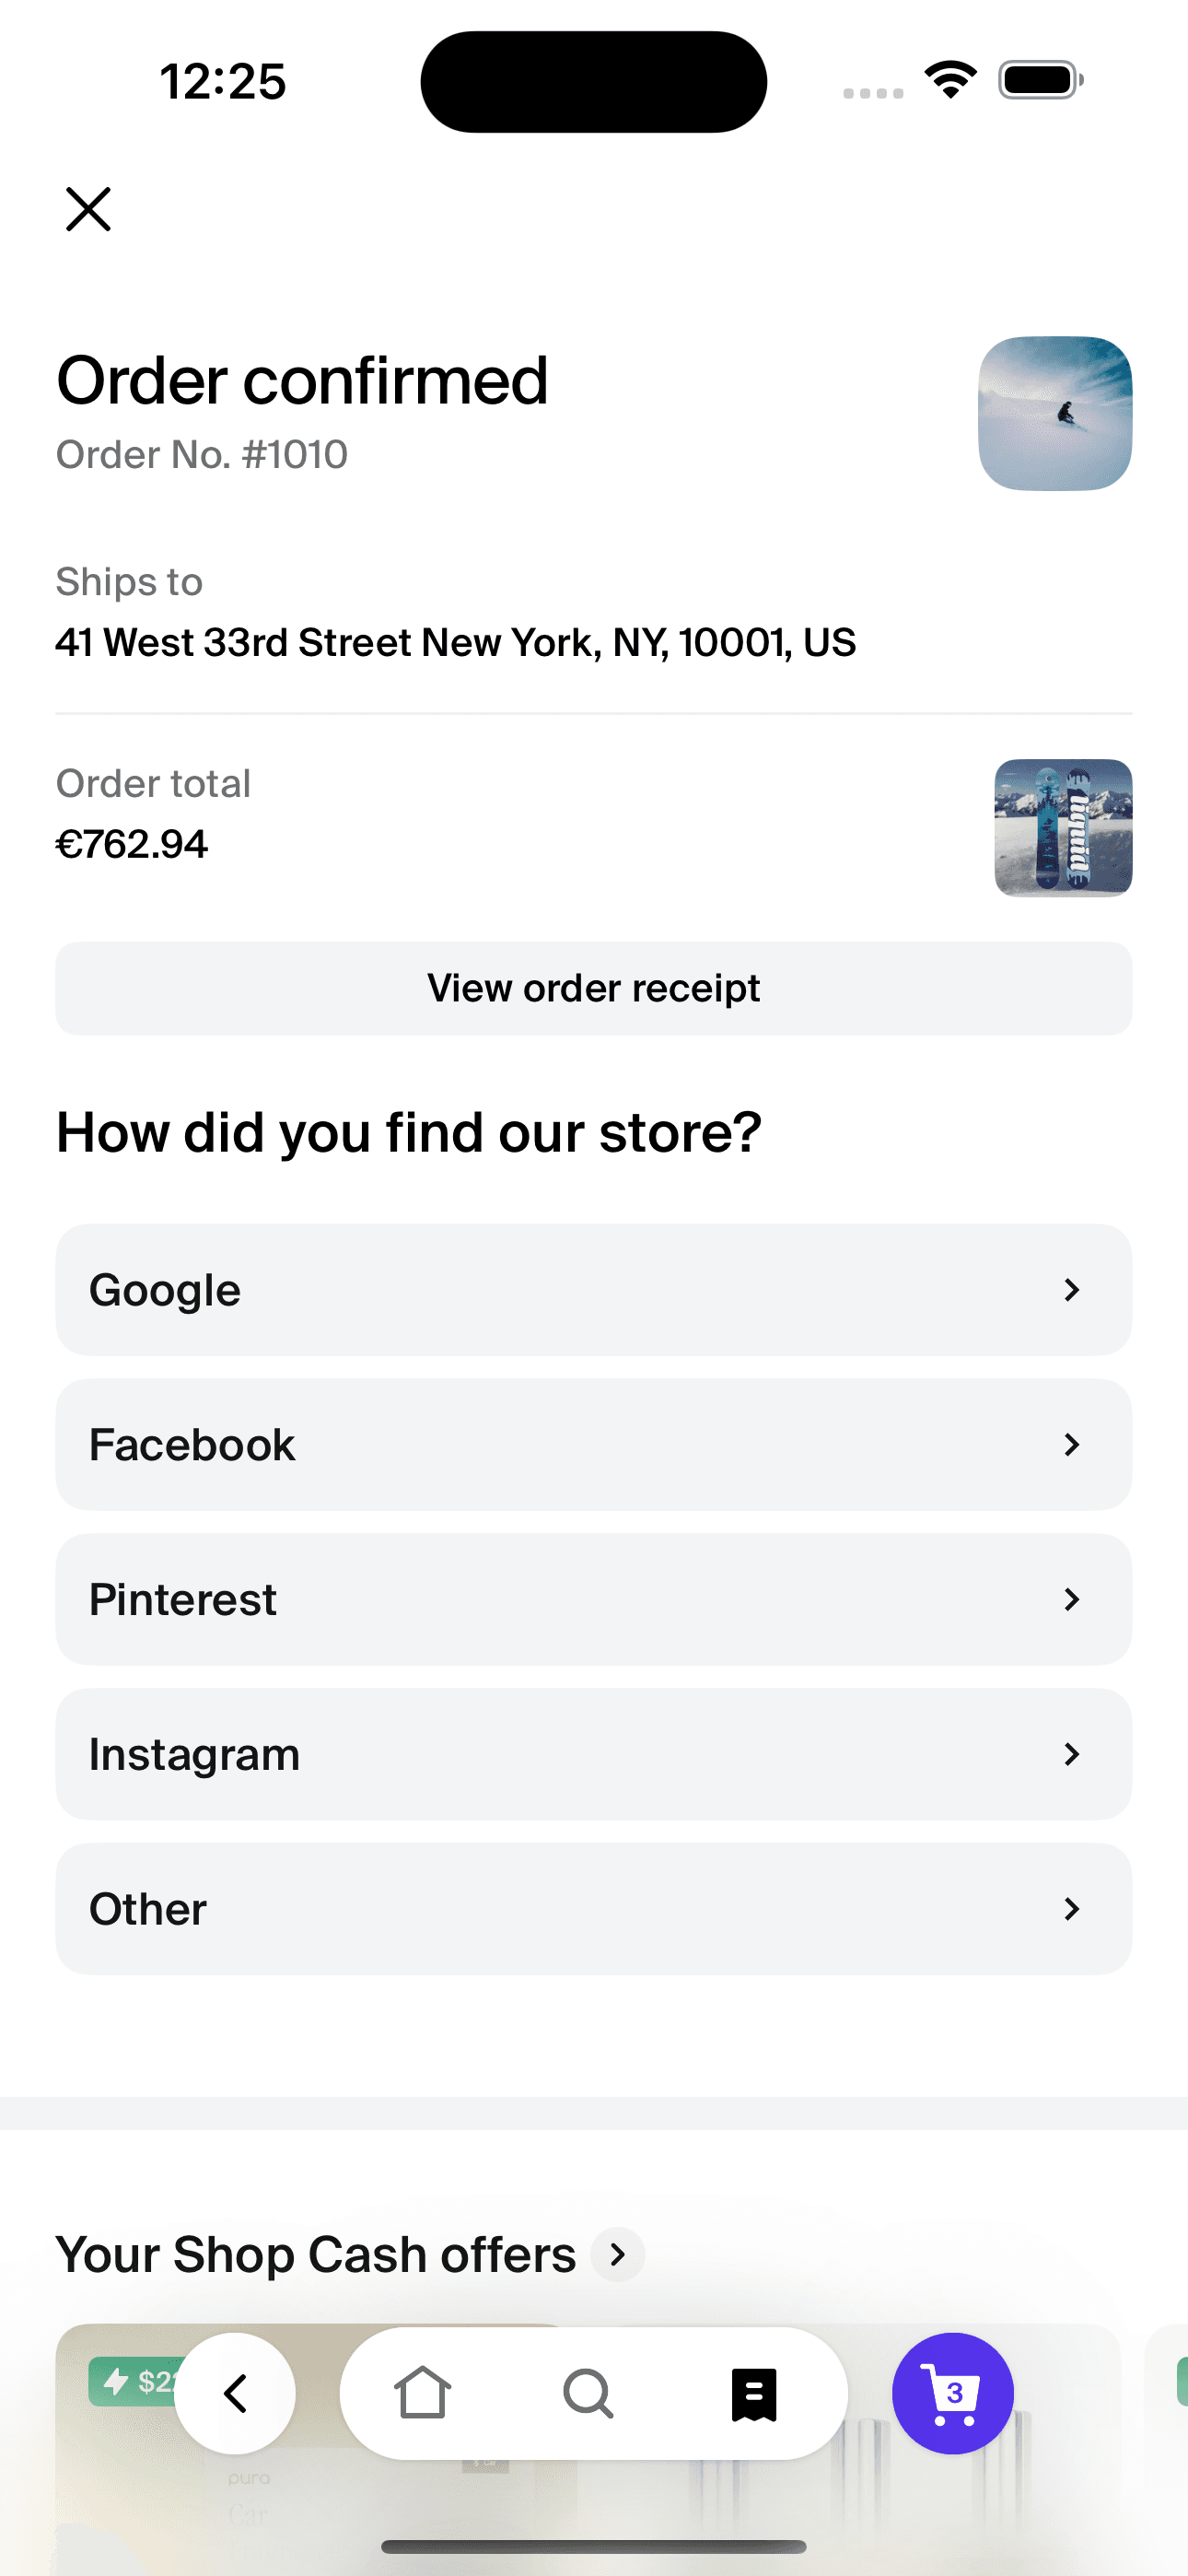
- In the Order Confirmation screen, just after the checkout process - (Order Confirmation Page)
- In the Order Management screen, after a user has selected one of their active orders - (Order Management Page)
For this tutorial, we'll choose the Order Management Page - After Order Details target and select the Survey Single Response extension type to simplify development.
npx shop-minis create-extension
A new folder named shop.order-management.order-details.render-after will be created in src/targets/. In the render.tsx file, you'll see the SurveySingleResponse component with some mock data.
export function Render({
  extensionData,
}: {
  extensionData: OrderManagementOrderDetailsRenderAfterQueryData | null
}) {
  // Here we are using seed data to populate the initial state of the survey.
  // You can replace this with the actual data from `extensionData`
  console.log('Order data from input query:', extensionData?.order)

  return (
    <SurveySingleResponse
      choices={seedData}
      onChoiceSelected={(index, value) =>
        console.log('Selected:', index, value)
      }
      title="How did you find our store?"
      seeMoreChoice={{label: 'Other', value: 'seeMore'}}
      singleQuestionSurvey={false}
    />
  )
}
To see how it looks, run:
npx shop-minis dev
Choose your preferred platform and navigate to any of your development stores to purchase a product.
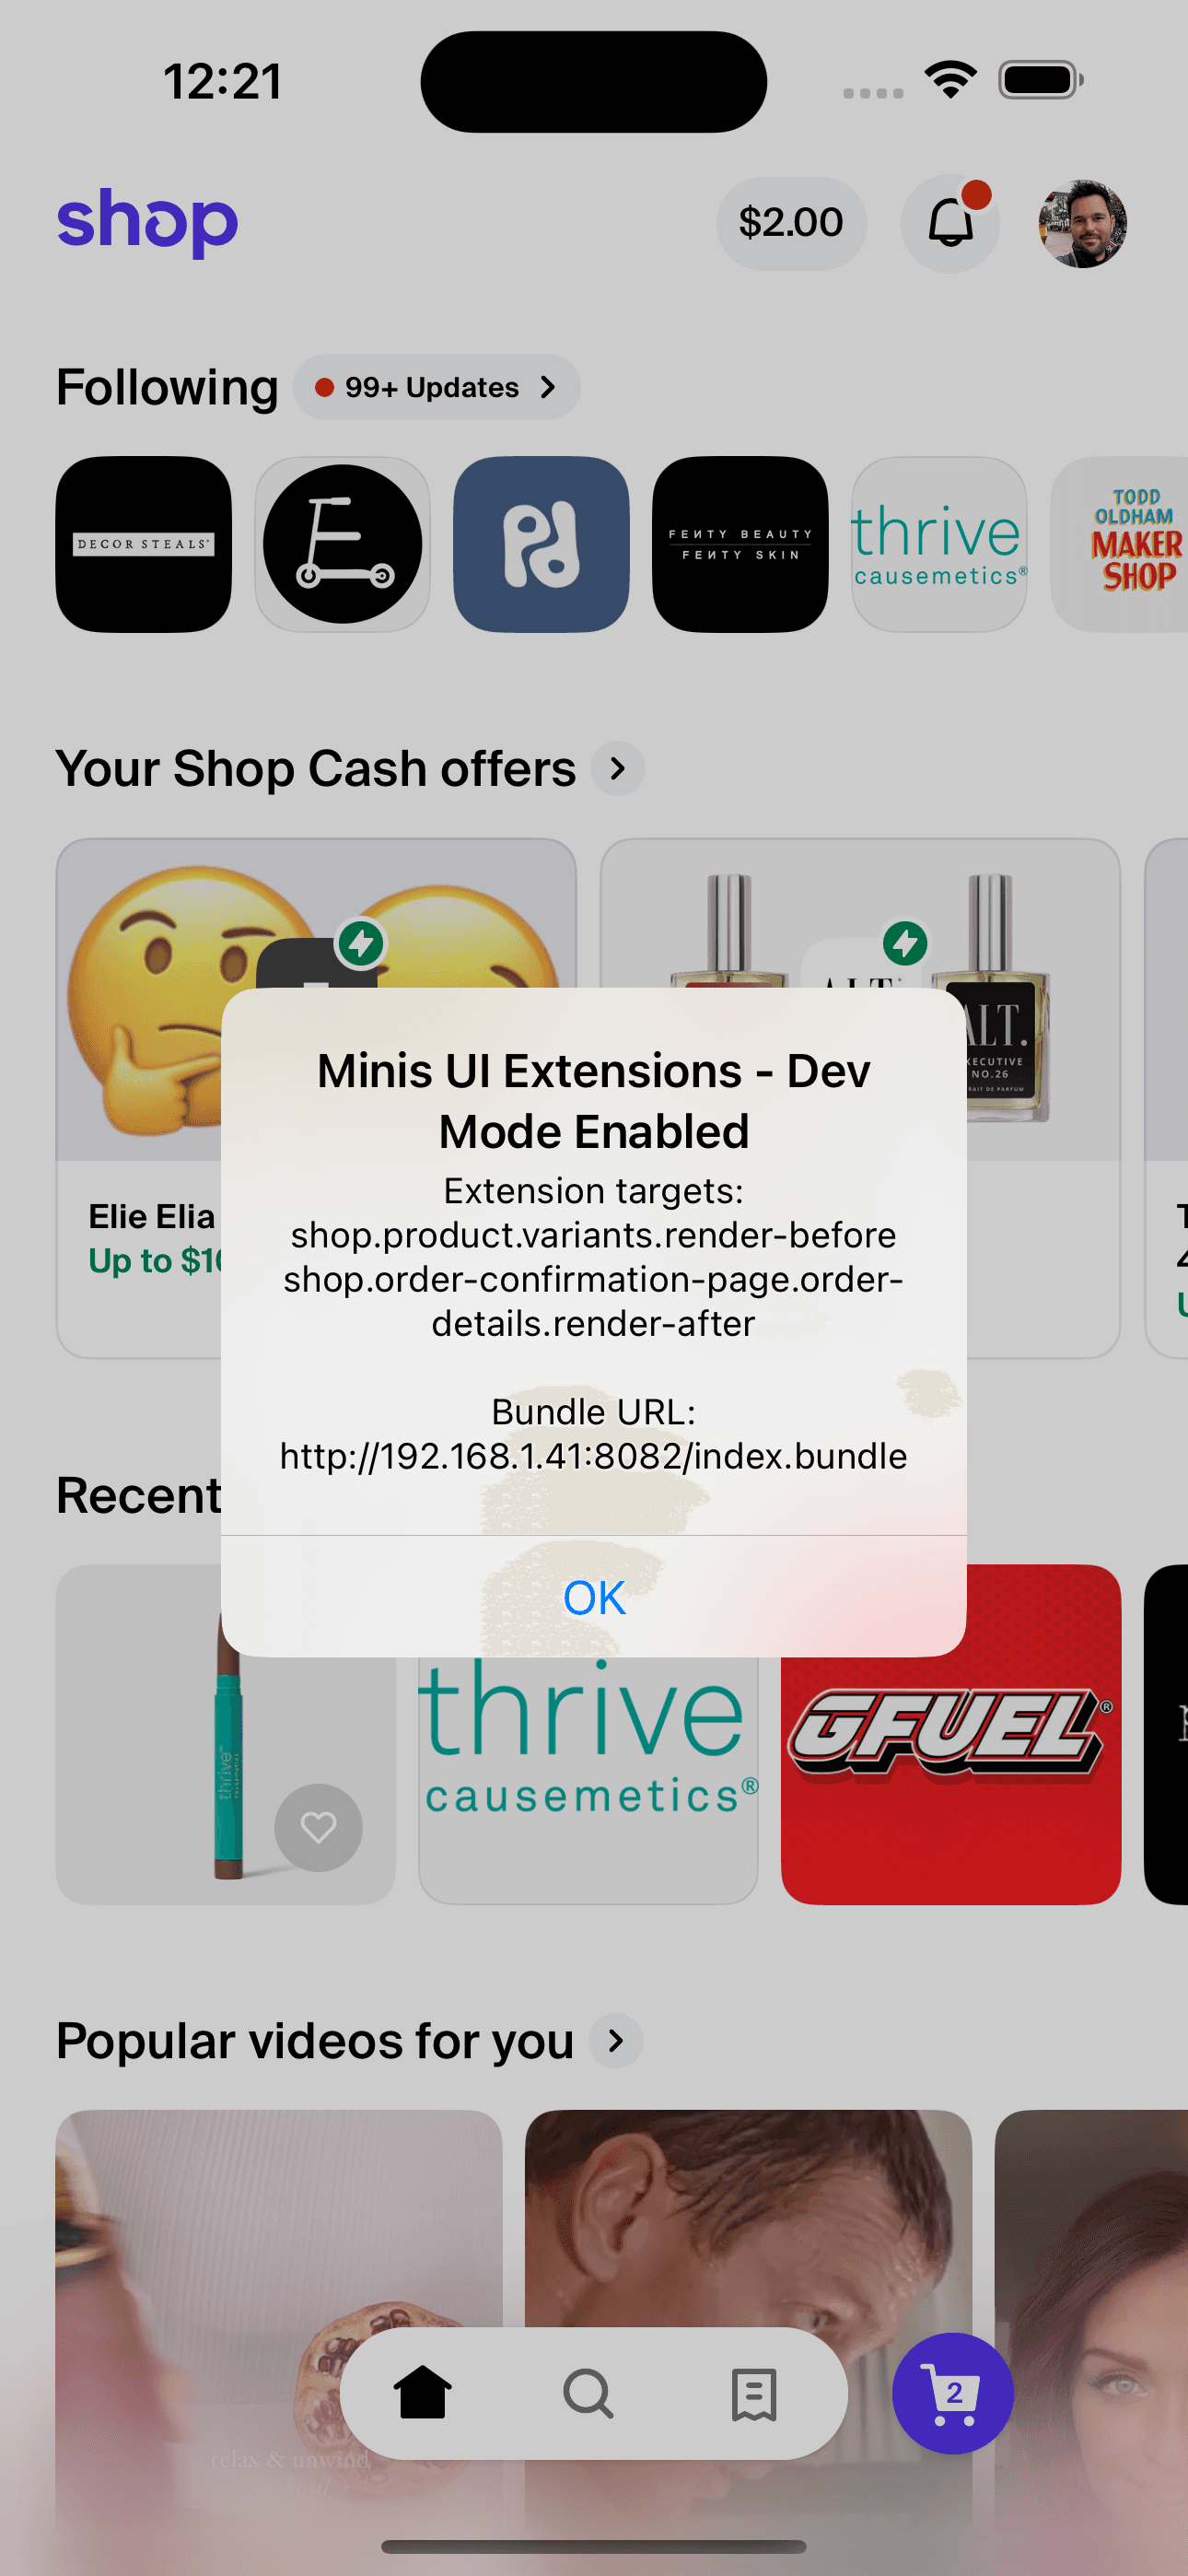
If it's your first time developing an extension, you should see this popup:

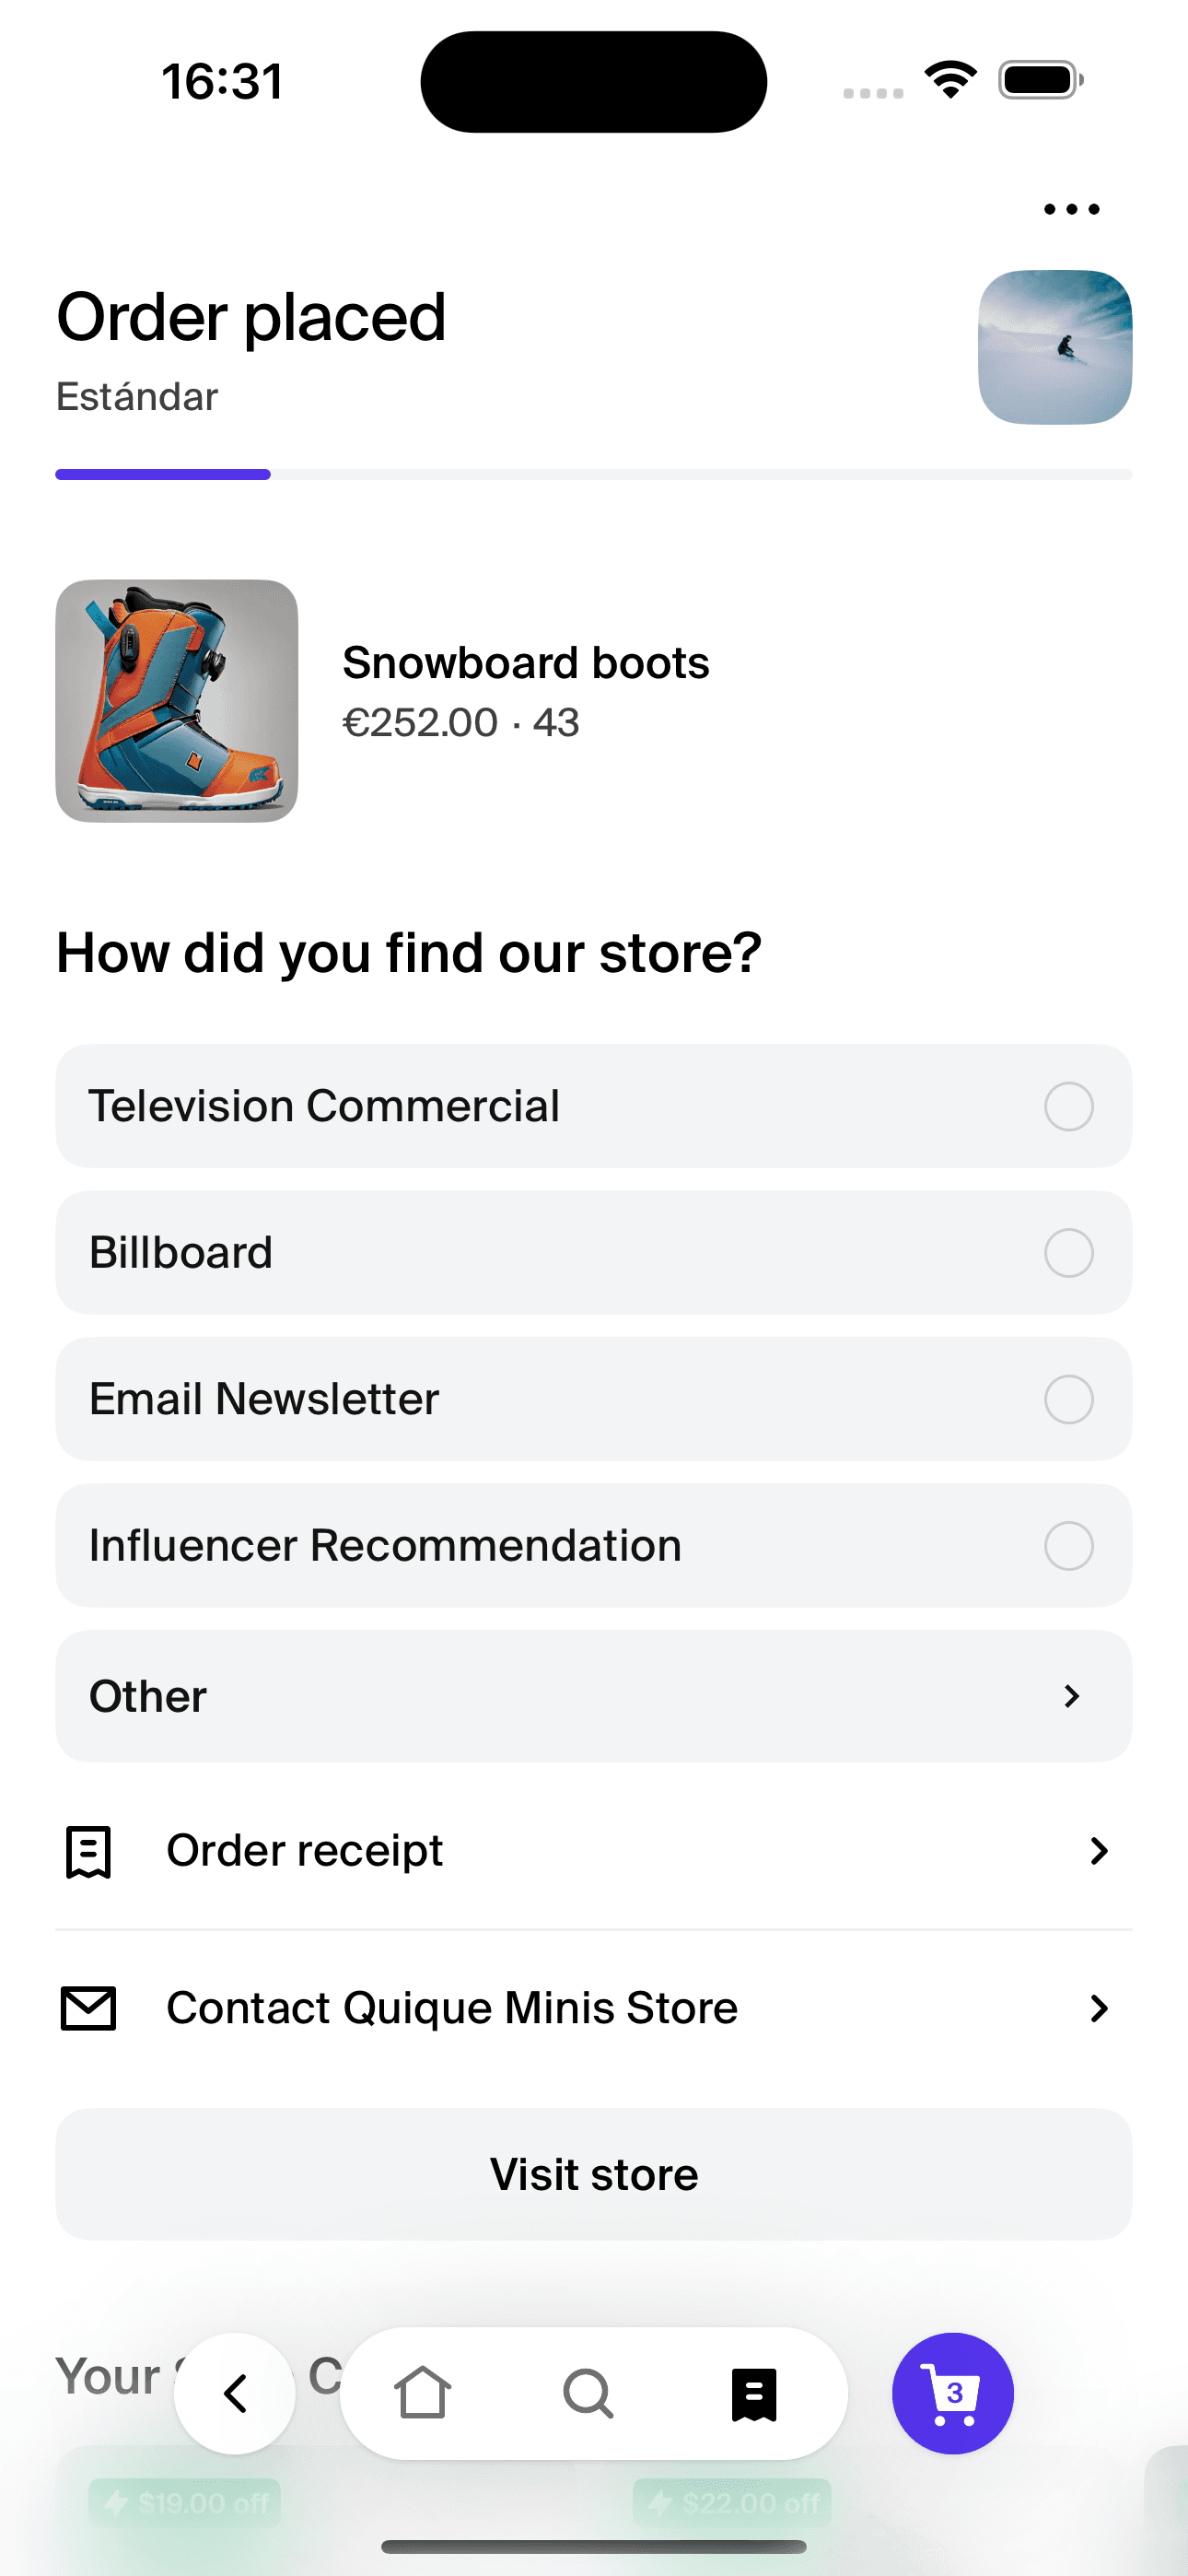
After purchasing a product, go to the Orders tab in the Shop app and tap on your recent order to see the Order Management page. You should see the extension rendered:

Step 2: Using real data
Before continuing, please follow the guide on metafields. We want to create metafields on our merchants' orders to hold the first question of our survey. First, create a new metafield definition using the Shopify Admin API:
mutation CreateMetafieldDefinition($definition: MetafieldDefinitionInput!) {
  metafieldDefinitionCreate(definition: $definition) {
    createdDefinition {
      id
      namespace
      key
      access {
        admin
        storefront
        customerAccount
      }
    }
    userErrors {
      field
      message
      code
    }
  }
}
With these variables:
{
  "definition": {
    "name": "Mini Surveys Metafield Definition",
    "namespace": "$app:surveys",
    "key": "survey-find-about-us",
    "type": "json",
    "ownerType": "ORDER",
    "access": {
      "admin": "MERCHANT_READ",
      "storefront": "PUBLIC_READ",
      "customerAccount": "READ"
    }
  }
}
Next, create a metafield containing the choices for our first question: "How did you find about us?". We'll include these options:
- Television Commercial
- Billboard
- Email Newsletter
- Influencer Recommendation
- Online Forum
- Trade Show
- Magazine Advertisement
- Sponsored Event
- Mobile App Ad
- Word of Mouth
- Company Website
- Partner Referral
To create the metafield, run this mutation against the Shopify Admin API when a new order is created.
Use the orders/create webhook to be notified when an order has been created in one of your merchants' stores.
mutation CreateMetafield {
  orderUpdate(
    input: {
      id: "gid://shopify/Order/6158856093978"
      metafields: [
        {
          namespace: "$app:surveys"
          key: "survey-find-about-us"
          value: "[{\"label\":\"Television Commercial\",\"value\":\"tv_ad\"},{\"label\":\"Billboard\",\"value\":\"billboard\"},{\"label\":\"Email Newsletter\",\"value\":\"email\"},{\"label\":\"Influencer Recommendation\",\"value\":\"influencer\"},{\"label\":\"Online Forum\",\"value\":\"forum\"},{\"label\":\"Trade Show\",\"value\":\"trade_show\"},{\"label\":\"Magazine Advertisement\",\"value\":\"magazine\"},{\"label\":\"Sponsored Event\",\"value\":\"event\"},{\"label\":\"Mobile App Ad\",\"value\":\"app_ad\"},{\"label\":\"Word of Mouth\",\"value\":\"word_of_mouth\"},{\"label\":\"Company Website\",\"value\":\"website\"},{\"label\":\"Partner Referral\",\"value\":\"partner\"}]"
          type: "json"
        }
      ]
    }
  ) {
    order {
      id
      metafield(namespace: "$app:surveys", key: "survey-find-about-us") {
        id
        namespace
        value
      }
    }
    userErrors {
      field
      message
    }
  }
}
To query an extension inside your Shop mini extension, use the expanded namespace. After running the mutation, check the expanded namespace in its response.
In this case, namespace: "$app:surveys" was transformed to namespace: "app--2315872--surveys".
In your extension's input.graphql query use app--{YOUR_ID}--surveys to read metafields on your app's namespace.
Update the input.graphql query from your extension to read the metafield of a given order:
query OrderManagementOrderDetailsRenderAfter {
  order {
    id
    survey: metafield(
      namespace: "app--{YOUR_ID}--surveys"
      key: "survey-find-about-us"
    ) {
      id
      value
    }
  }
}
Now, update the render.tsx file to get and parse the metafield value if it exists and render the SurveySingleResponse component, or return null if the order doesn't have an associated survey:
import {SurveySingleResponse} from '@shopify/shop-minis-ui-extensions'
import {ChoiceOption} from '@shopify/shop-minis-ui-extensions/src/extensions/survey-single-response/types'

import type {OrderManagementOrderDetailsRenderAfterQueryData} from './input.graphql'

export function Render({
  extensionData,
}: {
  extensionData: OrderManagementOrderDetailsRenderAfterQueryData | null
}) {
  if (!extensionData?.order?.survey) return
  const choiceOptions: ChoiceOption[] = JSON.parse(
    extensionData.order.survey.value
  )

  return (
    <SurveySingleResponse
      choices={choiceOptions}
      onChoiceSelected={(index, value) =>
        console.log('Selected:', index, value)
      }
      title="How did you find our store?"
      seeMoreChoice={{label: 'Other', value: 'seeMore'}}
      singleQuestionSurvey={false}
    />
  )
}
Start the mini dev server:
npm start
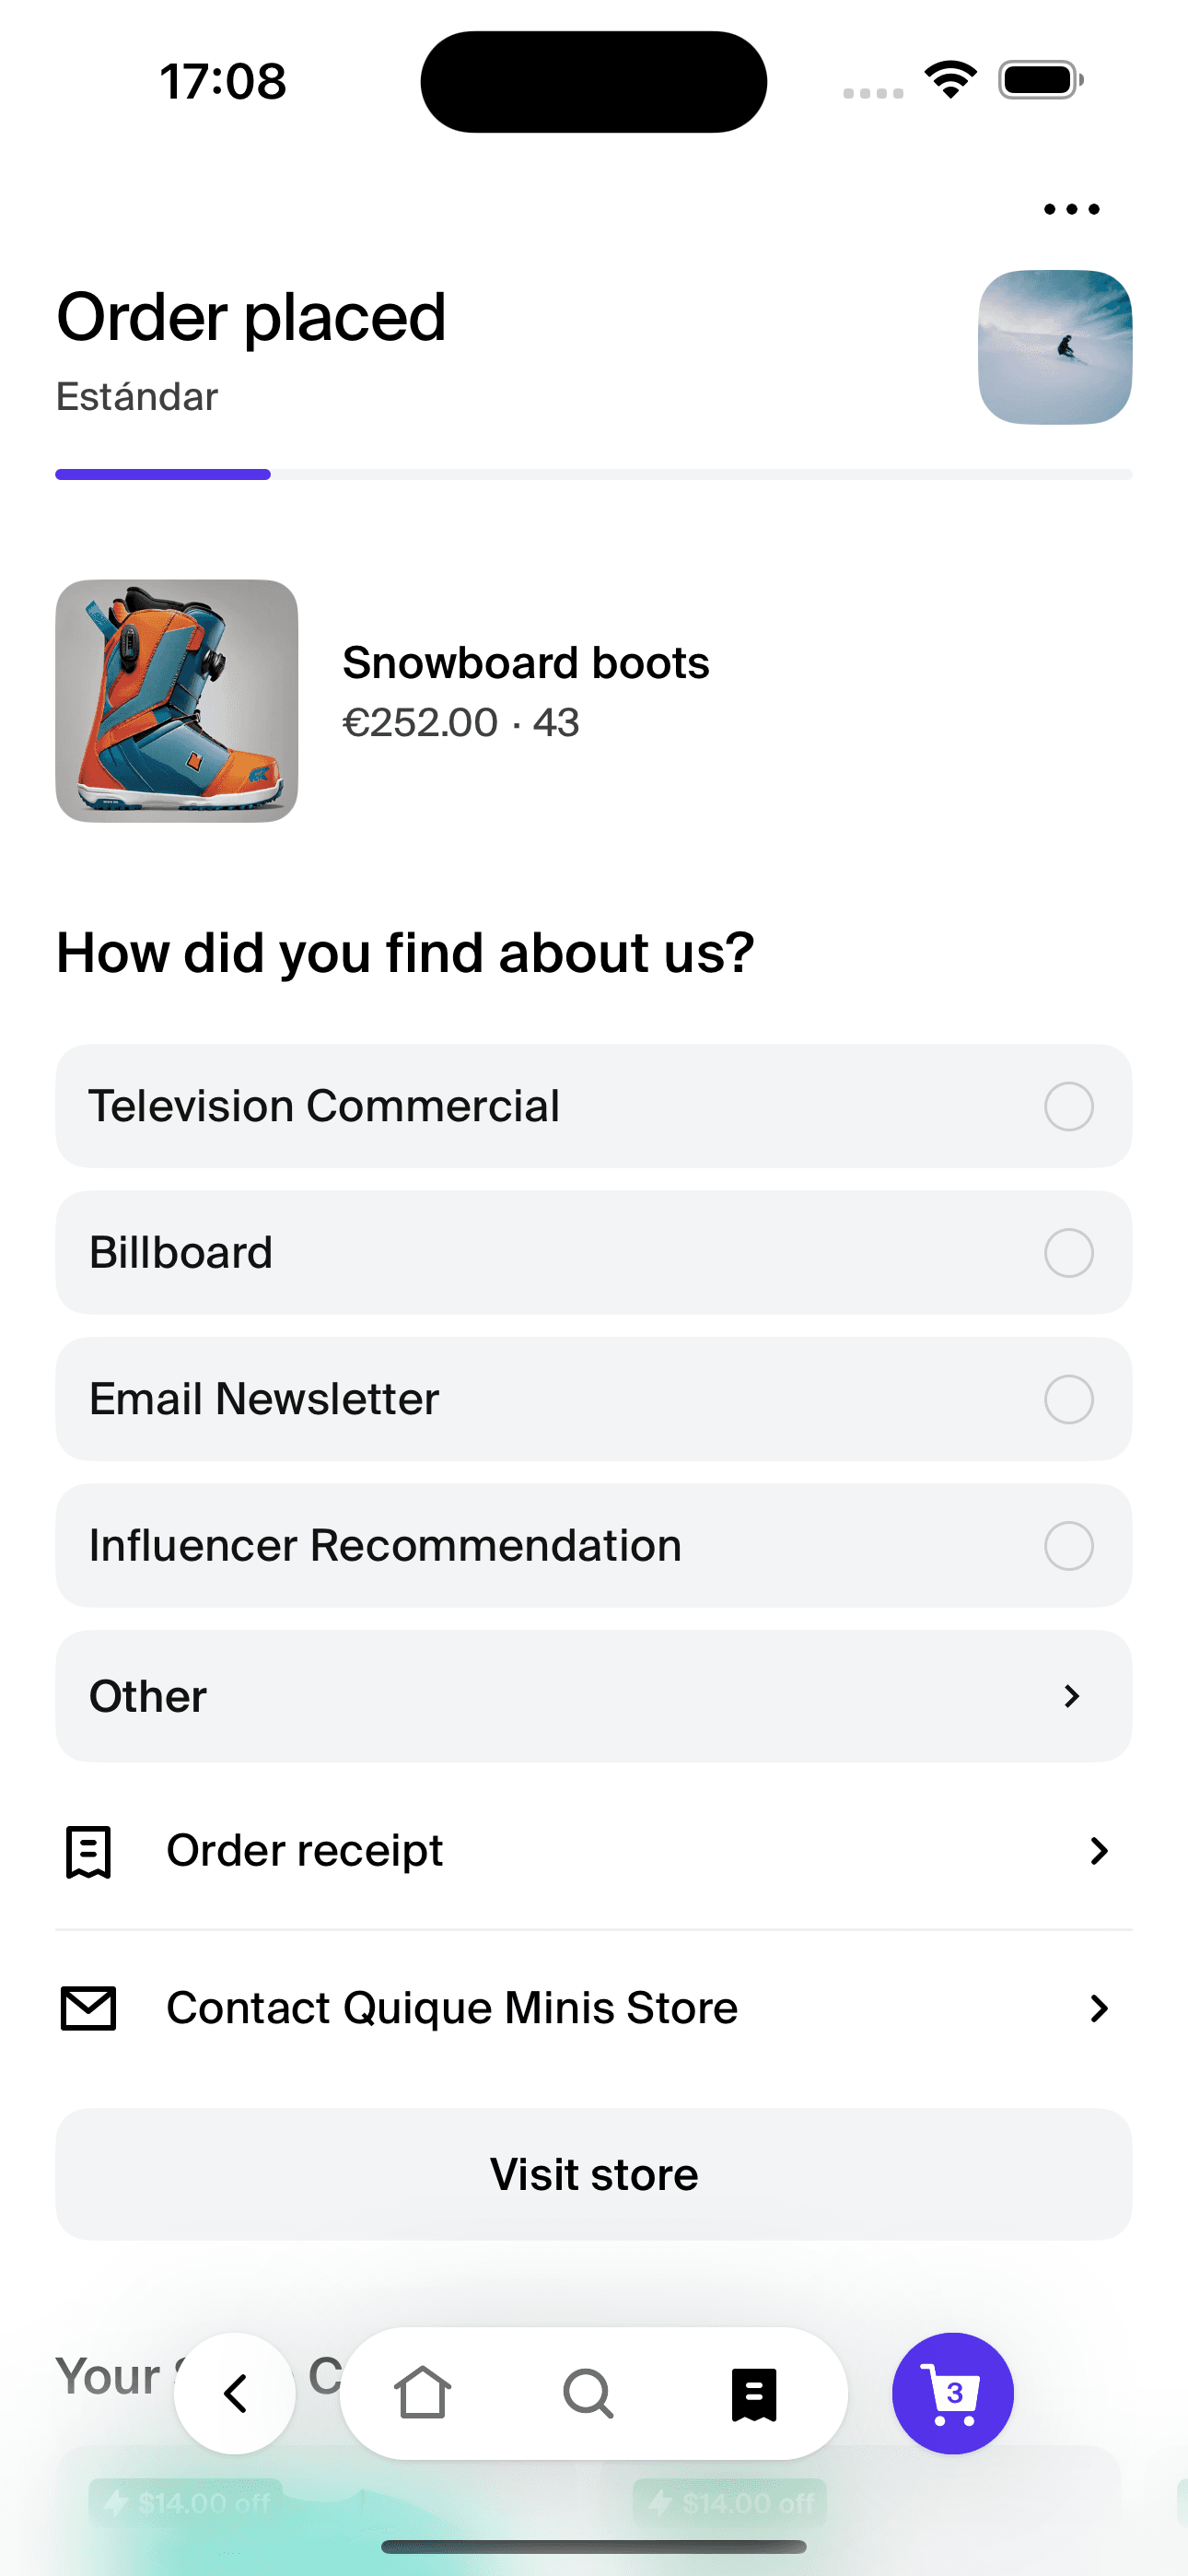
Navigate to the order list screen and open the order. You'll see the extension rendered with real data fetched from the metafield stored on that order.

Step 3: Customizing the survey extension
Now that we can query custom data from the order metafield, let's explore the component props.
The component is flexible. By adjusting the singleQuestionSurvey prop, you can adapt the component's
behavior to suit different survey styles and user experiences within your Shop mini. For a single question,
set this value to true and post the user's choice to your backend server in the onChoiceSelected callback.
For multiple questions, set the prop to false. You can continue with the survey questions in your mini's full-screen experience.
The component caps the choices to 5 options and adds a 'See More' choice at the end of the list. This button should open your
mini's full-screen experience and show all available choices to the user. You can customize the label and value of this choice
in the seeMoreChoice prop.
Here's an example of creating an inline survey with just one question:
export function Render({
  extensionData,
}: {
  extensionData: OrderManagementOrderDetailsRenderAfterQueryData | null
}) {
  const {openMiniViewer} = useShopActions()

  if (!extensionData?.order?.survey) return
  const questionChoices: ChoiceOption[] = JSON.parse(
    extensionData.order.survey.value
  )
  const seeMoreChoice = {label: 'Other', value: 'see-more'}
  const questionTitle = 'How did you find about us?'

  return (
    <SurveySingleResponse
      choices={questionChoices}
      onChoiceSelected={(_index, value) => {
        if (value === seeMoreChoice.value) {
          openMiniViewer({
            questionTitle,
            questionChoices,
            selectedChoice: value,
          })
        } else {
          //post response to backend
          console.log('selected choice', value)
        }
      }}
      title={questionTitle}
      seeMoreChoice={seeMoreChoice}
      singleQuestionSurvey
    />
  )
}

Step 4: Building the mini's full-screen experience
Finally, let's capture all possible states in our mini. Update the App component in the App.tsx file with the following code:
export function App() {
  const {extensionContext} = useMinisParams()
  const extraData = extensionContext?.extraData || {}
  const title = extraData.questionTitle
  return (
    <Box flex={1} backgroundColor="backgrounds-regular">
      <StatusBar barStyle="dark-content" />
      <SafeAreaView style={{flex: 1, justifyContent: 'center'}}>
        <ScrollView>
          <Box margin="m">
            <Text marginBottom="s" variant="sectionTitle">
              {title}
            </Text>
            <MultipleChoice
              choices={extraData.questionChoices}
              selectedIndexes={[]}
              onChoiceSelected={() => {}}
            />
          </Box>
        </ScrollView>
      </SafeAreaView>
    </Box>
  )
}
This will render the question's title and all available choices using the MultipleChoice component after the user taps on the 'Other' choice to see the rest of the available options.
We look forward to seeing what you build!